One thing we learned from lessons learned is that we don’t learn from lessons learned.
Somebody, alegedly
I don’t know where this quote comes from, a one-minute googling didn’t reveal it to me (but it isn’t mine, I’ve read it somewhere for sure).
Anyway, a month ago I started live streaming. This year with grand total of zero live conference sessions delivered must have been a contributing factor. I believe I miss speaking. So I decided to give it a try.
Now, almost exactly a month later, with five total streams delivered, four of which with actual relevant content (the first was merely an introduction), I know so much more about live streaming than when I started. Tell me I am wrong if you want, but I think sharing my lessons learned is a good idea. Maybe it motivates you to start streaming. Maybe it helps you start. Maybe… you never know!
So, this blog is a story of my journey, or adventure, with live streaming so far.
“Hello, World!”
For a while I’ve been following Erik Hougaard (sorry Erik, this time I spelled your name correctly!) and his video blog. It’s not live, but it’s video. It was cool.
Then another thing happened: Directions Virtual 2020. This year due to Covid19 outbreak, Directions went online. It wasn’t live, but it wasn’t far from it. I’ve recorded my session, and the recording was very bush-league. Some recordings I watched were of far better quality. People were using some sort of background removal approach, not necessarily a green screen, but something. I used nothing. Right after one of my sessions, I had a video call with Waldo, and I noticed he was using a white background.
So – what the heck – I ordered myself a green screen. When it arrived, I realized that I need a way to replace the green background with something, so I figured I need some sort of software to help me stream.
No problem, Google is my friend, I thought. And I was right, I quickly learned people are using Open Broadcaster Software (OBS) to stream and record. Nice, a new piece of software for my machine.
Open Broadcaster Software
What to say about it? It’s an open-source software (click here if you want to contribute) and as such it’s not exactly the most user-friendly piece of software you’ve ever seen, but it gets the job done. Quite nicely at that.
Thanks to a lot of contribution on its forum by a lot of users, I quickly learned how to use it and configure it to my needs.
Green Screen configuration
One of the first things – obviously – was to remove the green screen. Forums and Stack Overflow are pretty helpful, so I learned this is how to do it:
- Add your camera source to the scene.
- Select that source in the scene, and click Filters.
- Add a Chroma Key filter.
- Configure it according to your lightning, clothing, whatever.
Here’s my chroma key configuration
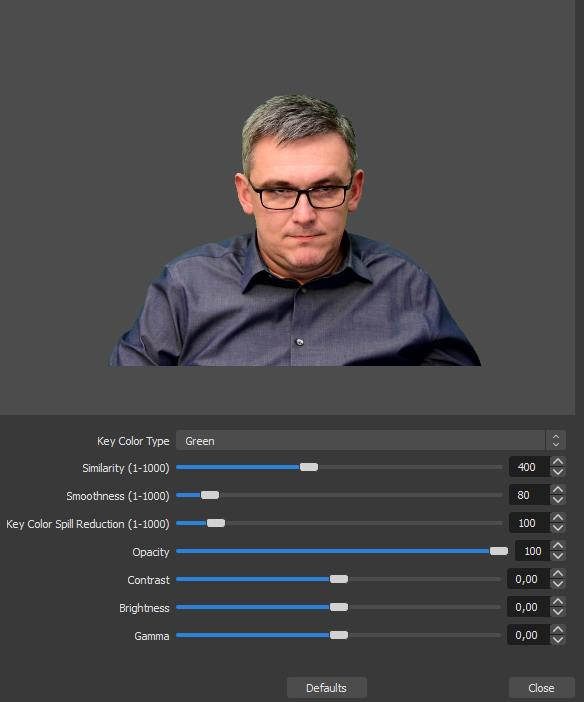
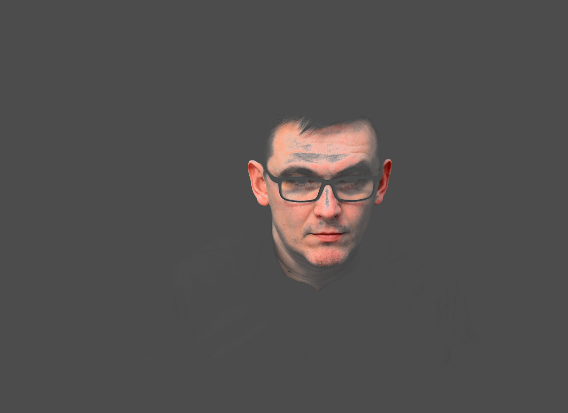
As you can see, it removes the background quite nicely. This is what the camera actually sees:

One big lesson learned for me was that default settings are almost always good enough. Since I have no experience with video production, one of the first things I noticed is that the Similarity slider in the screenshot above is at 400 (default). Sliding it down to 0 removes no background, and sliding it more to the right it starts removing more and more of it. At about 415 it starts visibly removing me (the actual content). At about 500 I am semi-transparent, and at about 600 it removes absolutely everything, green, pink, yellow, you name it.
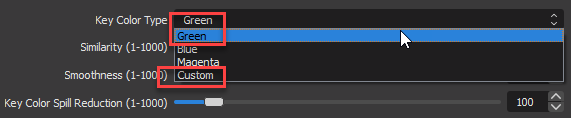
Regardless of where exactly it was, I noticed some artifacts: moving fast, waving, or doing similar things leaves some semi-transparent greenish ghosts or trails in the video feed. I at first attributed it to the green screen settings. So my train of though was that the similarity is so high because down at – say – 10, it removes practically nothing. And then I thought it was because the color I chose was some generic “green”, while the filter offered custom colors, too:
I wanted to try custom, so I took the screenshot without me in it, blurred the entire green content to get a uniform color, and then picked its RGB value. Then I fed it to the custom setting, and realized that already at similarity 1 (lowest setting) it gets nearly all of the background removed:
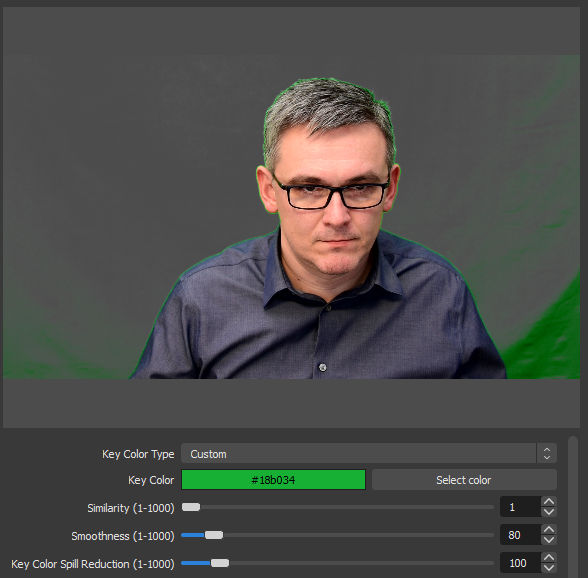
Cool, that must be it, I thought. However, I was totally wrong. Thing is – at this custom key color, Similarity only starts removing the background at lower settings, but it also starts removing the non-green content at fairly low settings, too. At 300 I get this:
I played a bit with similarity, smoothness, spill reduction (you don’t need to adjust other settings) and I realized that I get the best results from plain non-custom Green selection with default settings. Then depending on the actual lightning minor adjustments to the smoothness get it completely done for me.
Lesson learned: don’t waste time on this. Default is good enough.
Camera
So, at this point I had good green screen settings, I managed to remove my background and replace it with something else (and it felt so cool 😎). But still, those “ghosts” bothered me. They were especially prominent on the edges, especially between fingers of a raised hand:

No matter the chroma key settings, it felt nearly impossible to get completely rid of them. Removing them altogether also meant removing half of my hair, and making some other parts of the picture semi-transparent.
After some research and trial and error I identified the culprit: camera!
Up to that point I used my old Logitech C920 webcam. Back in the day it was a pretty cool one, with full HD and everything. However, webcams don’t provide good quality and their picture is always a bit, well, lossy. I don’t know if its their optics or software or whatever, but their image is never fully sharp and green screen makes this fact painfully obvious.
I was at first thinking that the problem was the resolution, and that a higher-resolution webcam will give better results. I did some research and figured out that I was wrong. To get a really sharp picture, no webcam will do. Live streamers either use their smartphones, or photo cameras (with HDMI output). No webcams.
I’ve owned a Nikon D7200 for nearly five years, and I checked it and realized that it’s actually capable of delivering live HDMI video feed and that I can use it for streaming.
To connect your DSLR (or other photography) camera to your computer and use it as a video input, you need a capture card. My research told me that Elgato Cam Link 4K is the best choice. So I got myself one. I also got myself a tripod. When the equipment arrived, I mounted the camera, connected it to the capture card, followed some blogs about how to configure a Nikon DSLR to feed its live view through a capture card, and OBS was immediately able to read it. It felt so cool. And the quality, wow! Totally uncomparable to a webcam.
However, there was a problem. The video feed seemed to lag behind the audio. And this is what took me the most time to figure out.
Audio Recording
If you want to have good audio (and I believe in my videos I have good audio) you need a good microphone. Webcam microphones, built-in microphones, headset microphones – none of them will do. Years ago, when I was routinely recording “How do I…” videos for Microsoft, I got myself a Blue Yeti Pro (version 2.0). Before that I tried some approaches, but nothing worked like Yeti. Yeti is amazing, and it really produces awesome audio. If there is anything I can say is – get yourself a nice professional microphone, it will make a ton of difference!
Now, back to my camera, and the audio and video being out of sync. My Yeti has an XLR output socket. People use it to pick the audio signal directly from the mike and feed it to audio equipment (mixing stations, whatever they are called).
Let’s get it straight: I know chicken shit about audio recording. I couldn’t tell a mixing station from, well, anything else in the world. My Yeti came with an XLR cable splitter (one XLR to two XLR, whatever that’s called). Also, my camera has a 3.5mm audio input jack socket. So I thought I could get an XLR-to-3.5mm cable and connect these two. Theoretically – and that’s what some blogs and YouTube channels confirmed – you can connect your microphone to your camera, and then read *both* audio and video from the HDMI to get audio and video synchronized on a single input source.
Long story short: it didn’t work for me. I am not entirely sure what’s wrong (as I said, I know chicken shit about it, probably far less), so I connected all these cables. All it produced was a metric crap ton of white noise, and some barely recognizable hisses that remotely resembled human speech when I actually spoke.
From what I could figure out: neither Nikon D7200 is capable of producing good audio (no matter what the source is) nor my cable setup was correct. Perhaps I would have to use an actual mixing station, or some sort of power input at some point between my microphone and camera, but I didn’t want to experiment there.
I decided to settle on syncing audio and video in the software.
Thankfully, OBS can do this. It took some fumbling to settle at 233ms delayed audio recording:
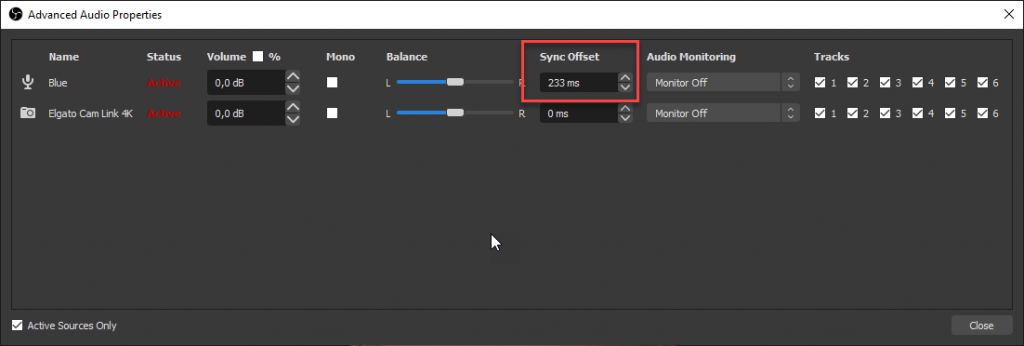
This got my audio and video back in sync when I recorded (or streamed), and I decided to settle with that.
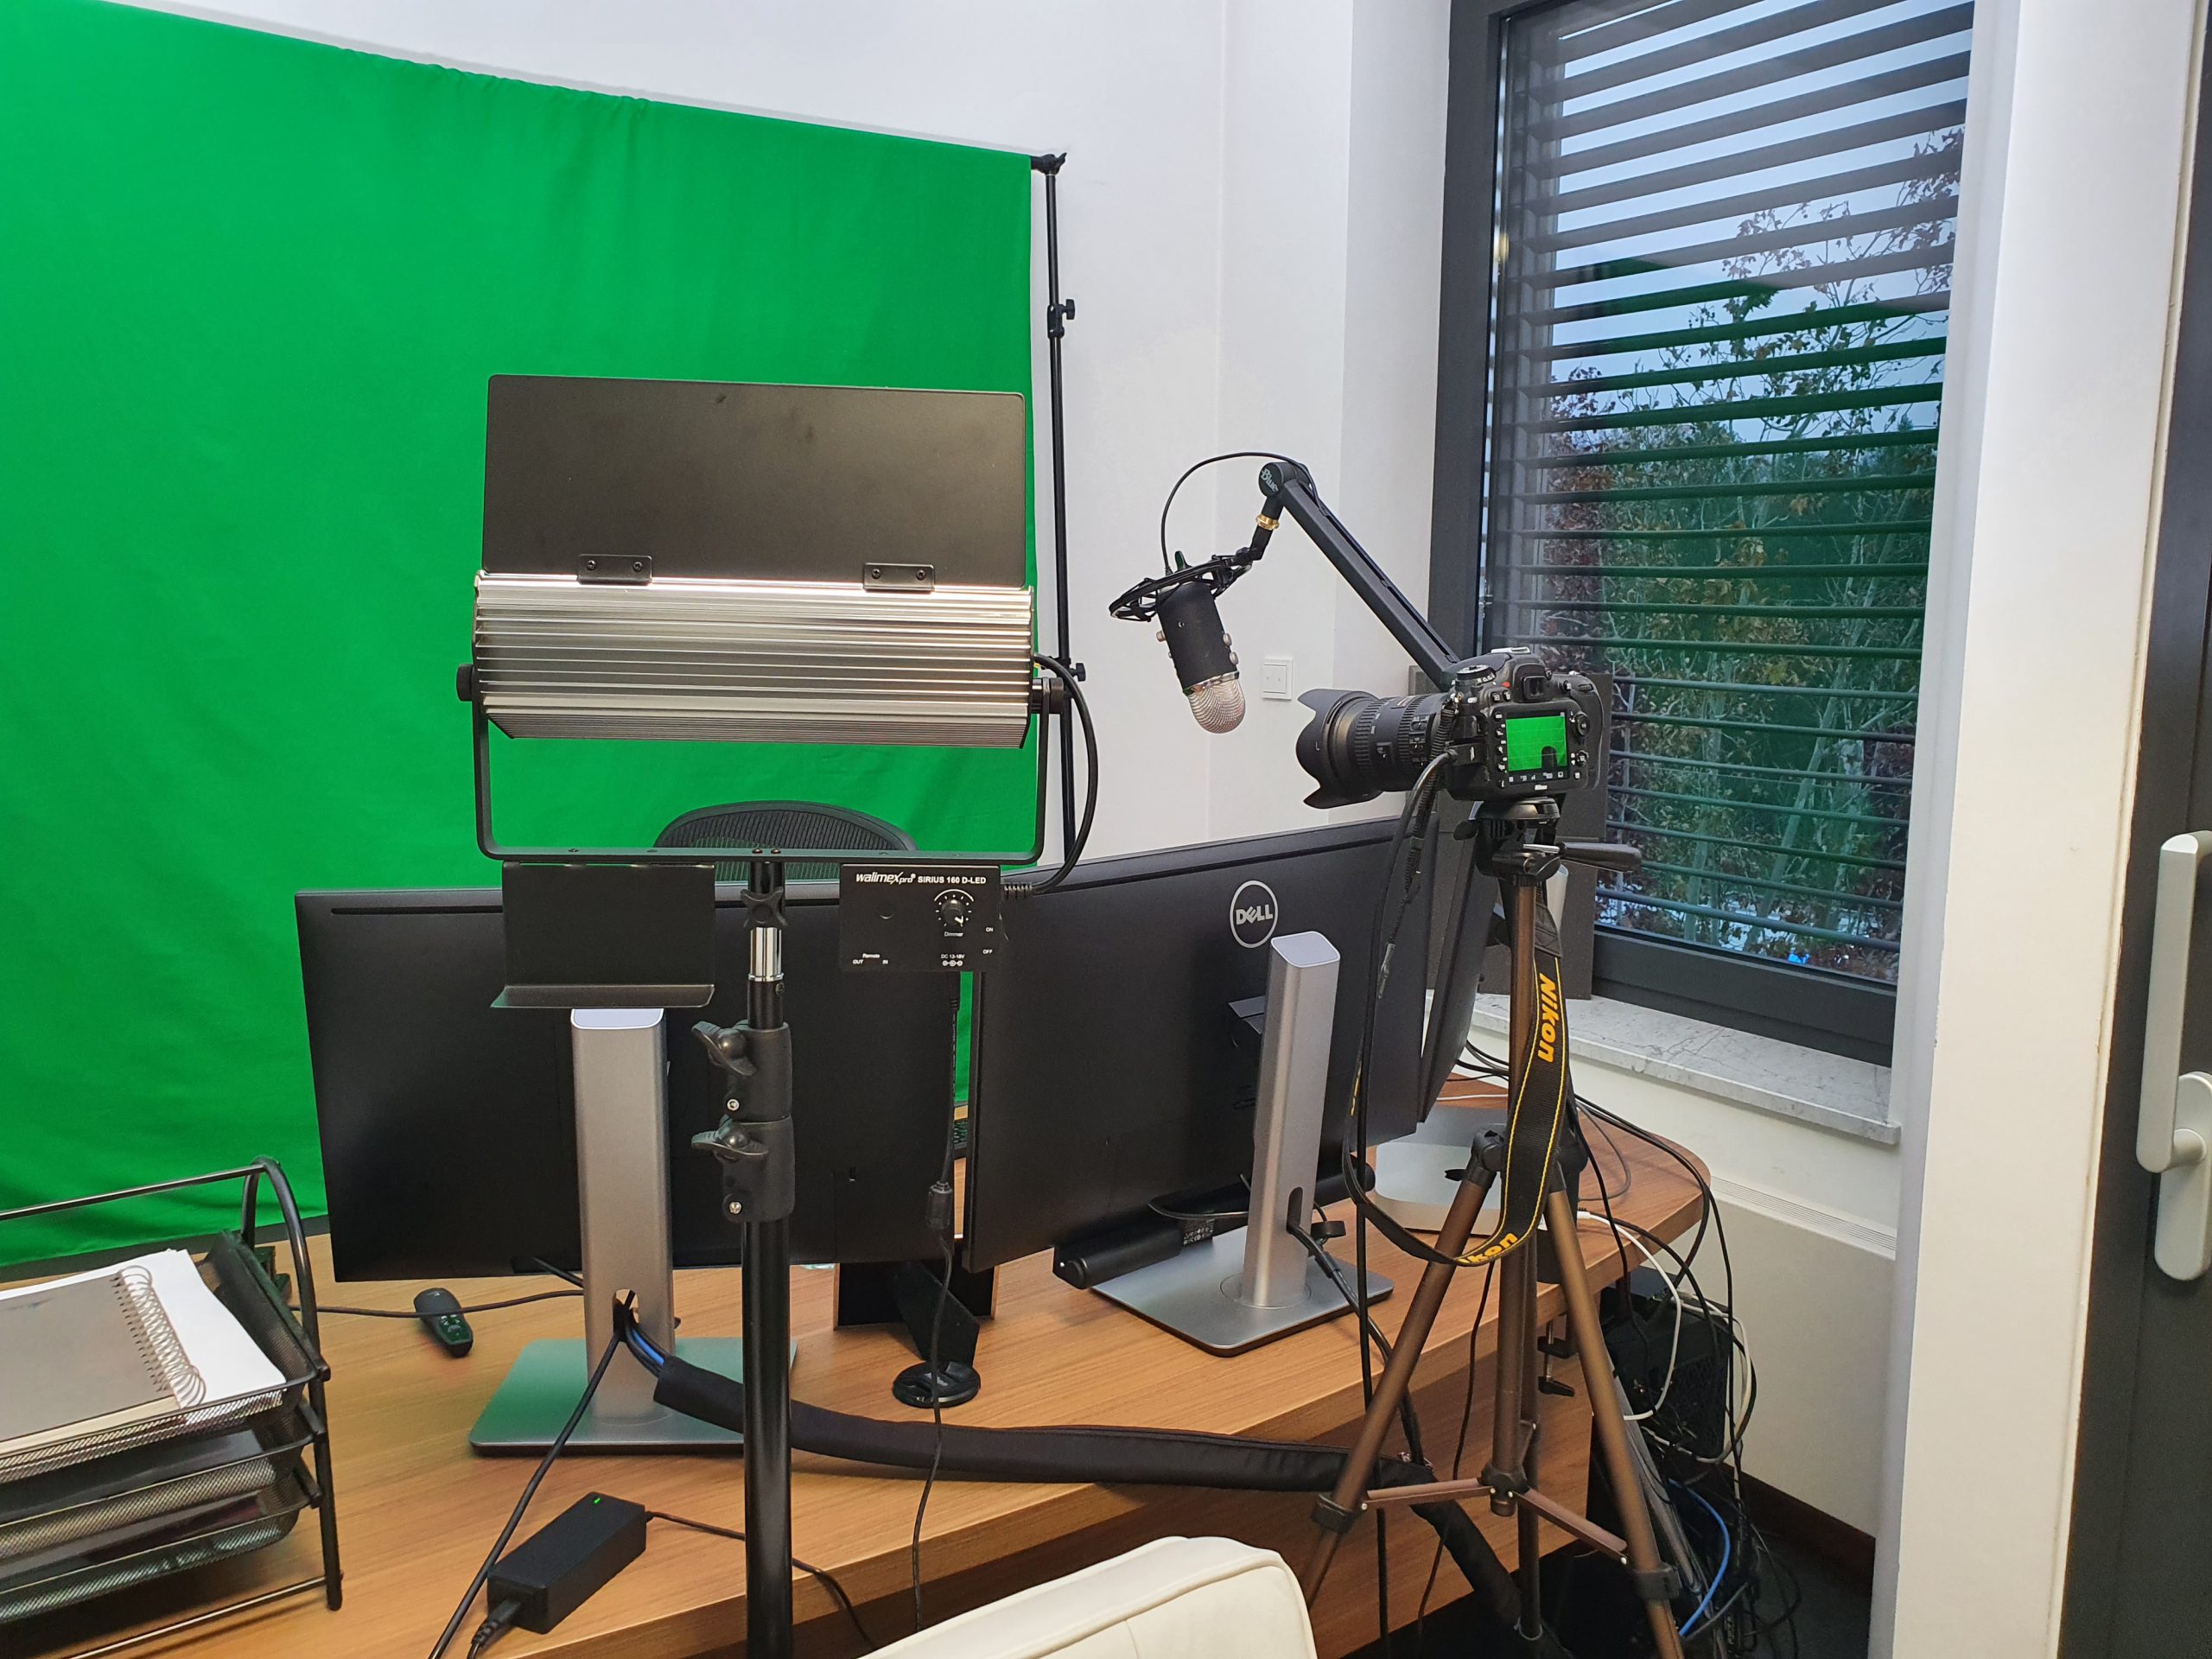
Light and illumination
Another thing I had problems with from day one was light. On my left there is a big window and while the eye and brain are good at equalizing illumination differences on objects, cameras suck at it, webcams or professional alike.
No matter how I set it up, my left side of face was bright, and my right side was in deep shadow. Blinding the window didn’t help much: it only made the total illumination worse which made the camera record at lower effective FPS and then compensate for it in the software. Earlier with the webcam it produced really bad results. Later with DSLR it was a tad better (Nikon can handle ridiculously high ISO values!) but I was losing sharpness no matter what.
If you think that switching the light on would make things better, so did I 😂 In fact, if you have incandescent light, it would probably work better, but my – otherwise very good and – LED ceiling light caused an awful amount of flickering.
The problem – I suppose – is that alternating electrical current that works at 50 Hz and that the constant change of direction causes the lamp to flicker. Since human eye is way slower than 50 Hz, the effect is imperceptible with naked eye. Cameras – though – catch this, and since most cameras record either at 60 FPS or 30 FPS, this will produce some flicker. Camera would have to work at 50 Hz to not produce any flickering. Logitech webcam driver can handle this as it allows you to compensate for this flickering by recording at 50 FPs. However, my capture card cannot. It records at steady 30 FPS, and there was no way for me to get rid of the flicker.
So I ordered myself a studio reflector 😂 (where does this end, you may ask – in fact, so do I… so do I…)
The difference between a normal office illumination ceiling lamp and a studio reflector is that designers of ceiling lamps don’t care about flickering – it’s imperceptible unless you are recording video. Studio reflectors do something about this, and I assume that either they do some AC/DC conversion to make it a steady, non-flickering stream of electrons, or they otherwise compensate for the intrinsic 50 Hz frequency of input AC current.
The reflector really made all the difference here! Now I could properly stream a steady, flicker-free, evenly illuminated picture of me to the world. What a delight!
Until last Friday my Nikon battery died mid-live-streaming!
Cameras need power to operate…
Don’t forget that most photography cameras operate on batteries, and that batteries have an annoying tendency of going flat. One big lesson learned for me was that the more you use a battery, the sooner it dies.
In fact, I was quite aware of this, of course. I even have two batteries for my Nikon. And I even tested it. Realizing that I don’t want my camera to die mid-streaming, I did a test one day. I fully charged both my batteries, and then set up all the equipment to my live streaming setup, and started recording. I wanted to figure out how much would batteries last. One died after 1 hour 45 minutes, and another after 2 hours 15 minutes. Both sufficient for a live streaming session, mind you.
Yet, last Friday I set up my “studio” for streaming about an hour before the session, and left the camera on. I made myself a note to change the battery before going live. But then I managed to not read the note, and I started streaming.
The rest is history. You have it all recorded for posterity right here (watch for about 10 seconds and you’ll see).
Let me tell you: it sucks when your camera dies while you are streaming!
(Yes, I ordered a power adapter for my Nikon, so my feed will never die again.)
More about audio…
The next thing I noticed is that as I type on my keyboard (and while I demo, I usually do a lot of typing) the microphone produces a lot of ugly background noise. Apparently, as the microphone was mounted on a stand, and the stand was sitting on my desk, and I was striking a keyboard sitting on the same desk, keystrokes caused desk to vibrate, and the desk transfers all those vibrations right into the microphone membrane.
The only way to solve this problem: shock mount. This site I linked here is an article titled “Do I really need a shock mount”. The answer is yes, you do.
So – you guess – I ordered a shock mount. I also ordered a boom arm for good measure. There are shock mounts that work standalone, but I figured a boom arm would move my microphone away from my desk, so both the desk would be less cluttered, but the humongous size of my Yeti would no longer obstruct the view of my monitors – another important thing while demoing.
When I got all this set up, the difference was noticeable. No more muffled bumps while I type, clear view of my monitors no matter my posture, sheer pleasure!
And this is the view from my presenter cockpit:
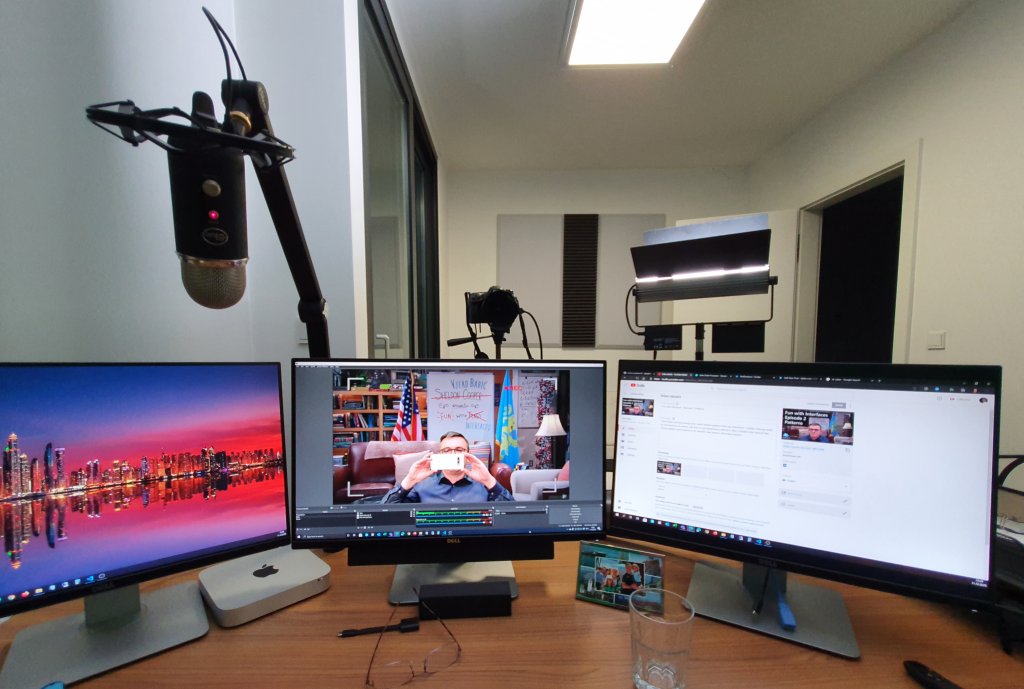
(That Mini Mac in the picture – that’s just for testing stuff on Mac and for debugging Safari when developing control add-ins. You wouldn’t believe how opinionated Safari is when it comes to web standards, and the only thing to make it all work is to use a Mac. Normally I use Windows. I hate Macs. I nearly hate everything with that fruit logo on it. The fruit itself is cool, though. Healthy, too.)
… and even more about camera
Just as a side note. I ordered a professional camcorder, too. I was checking some comparisons between camcorders and DSLRs for live streaming, and the difference was convincing.
Yeah, I know… 😂
(When my credit card bill finally arrived yesterday, yeah… no comment on that 😂 Good stuff is – it’s all business purposes, so it’s tax-deductible)
Elgato Stream Deck (and more about audio)
I will be eternally grateful to Waldo for opening my eyes with the Stream Deck. That’s just one indispensable piece of hardware if you are doing any even remotely serious video production. It works nicely with OBS, and switching between scenes (and doing other things, like checking how many participants are there, or tweeting for example) is literally at your fingertips.
Yes, yes, it’s on that credit card bill, too! 😂 You don’t want to know (or maybe you started keeping tab at some point).
However, Elgato indirectly caused some trouble to me.
Soon after installing OBS, I realized I can use it for a lot more than streaming. I can also use its virtual camera and feed its output into Teams, for example. It makes for kick-ass presence on teams that very few people fail to immediately notice. I also do some internal how-to recordings for NaviPartner, and I need to be able to switch between different scenes and modes quickly.
What does it have to do with the Stream Deck? Well, indirectly it does. To be able to switch scenes while presenting, without having to think too much, I configured several Stream Deck profiles. But then to spend least time configuring OBS, I realized Stream Deck has something to help, too: scene collections.
So, today, while preparing my stream, I configured my OBS with scene collections: Virtual Camera collection, Vjeko.live collection, Presentation collection. It felt so powerful to have all this at my fingertips. Elgato picks up on those collections and makes it easy to select the correct scene from correct scene collection when needed.
Yeah, until 17 minutes into my stream today I got a phone call from Arend-Jan. Arend-Jan is a good friend, but he never calls me on my phone! So I figured out something must be wrong. So he explained to me: there was no sound in my live stream!
First lesson learned here: get yourself a monitor on which you can monitor the live stream chat. People were yelling at me there, but I didn’t have it present on my screen (I have three screens, but trust me – it’s not enough when you live stream demos!) so I didn’t see it.
(Yes, I am ordering the fourth monitor, what do you know… 🙄)
Again, what does it have to do with Stream Deck? Actually, it has more to do with OBS. Creating a new scene collection removes all audio sources from all new scenes you create. With only the default scene collection, OBS adds all available audio input devices as sources which are always available to all scenes (you need to pick which one to use). However, when you create a new scene collection, you have to manually add each audio source you want to use to each scene you want to present from.
I learned all this while live streaming today 😂
(And yes – adding the same audio source to the scene means you have to sync the audio with the video again, it will lose your sync settings too! My voice was again 233ms ahead of my video today.)
Fancy stuff
When you start live streaming you can easily get carried away with all things OBS can do. It can combine various camera feeds, computer screens, video files, images, whatnot. For my first couple of streams I had an animated video background on top of which I added my camera source with green screen, and a screen input with chroma key settings to present PowerPoint with transparent background (more on that a bit down).
To be able to do that, you need a fast computer. Mine wasn’t fast enough. It was so slow actually that I had to kill all VMs, all Docker containers, stop most unneeded services, and actually present from non-virtual installation of BC, only then the machine had enough resources left over from greedy OBS having to encode all this into a single stream.
Yeah, you guessed right 😂
Bottom line is: you need a powerful processor and a video card (preferably NVidia) capable of hardware encoding.
Or you can forget about being able to combine all those things and settle with streaming only a single source at a time. No green screen, no fancy camera over demo, or stuff.
More fancy stuff
One thing I wanted to do right for my first stream was to have those fancy overlays over the video. You know, animated text and other content over camera image. PowerPoint is otherwise great at creating animated slide transitions (morph, cough, cough), but it’s not transparent.
Well, I thought I nailed that one. Chroma key, right?
Wrong.
Well, I was actually on the right path. I figured that if I do my PowerPoint slide deck on green background, and then use chroma key filter in OBS over my display source to remove the background, I can do transparent PowerPoint slide show over my video feed, thus presenting PPT content over everything else I present.
The problem is, chroma key is good for video input, but for display input there were no settings to properly configure it. I fumbled a lot, I figured the best could be achieved with Pink chroma key OBS filter preset. That’s why my face seemed blushing in my first stream! It was actually illuminated by the full magenta background on my presentation screen!
Soon, I learned that instead of using chroma key, with screen input you need to use the Color Key filter. And it works best with full black background. Here’s the settings:
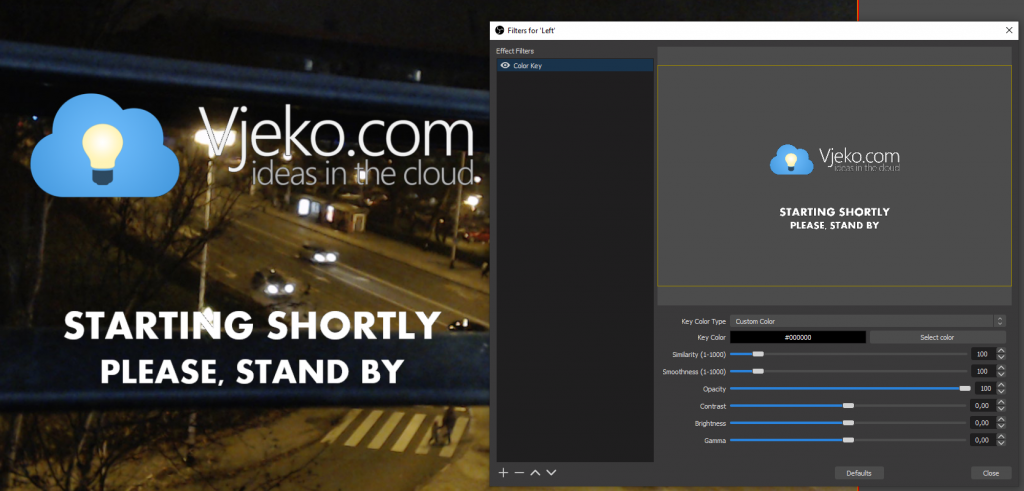
In short, these settings allow you to have black blackground in your slide deck. Everything black will be presented as transparent, and it allows nice PowerPoint overlays (animated, yay!) on top of your video feed.
I didn’t spend any money on this one, at least, finally! 😂
That’s it
Or at least it feels that way. All in all, this entire live streaming journey has been quite fun and interesting, and I am sure that my next stream will be almost as good as if I’ve been doing it for years.
And of course, this is not the end of it. I believe I will learn a lot more in the months ahead of me! And maybe I even post an off-topic blog about it, if I catch a bit of spare time.
I hope you don’t mind this veering off-course I did today, and this off-topic post. And if you are a live streamer, or considering becoming one – I hope it was useful info for you.
Have a great weekend!
Pingback: Live Streaming Lessons Learned - Vjeko.com - Dynamics 365 Business Central/NAV User Group - Dynamics User Group