Strange times. I never stop to be amazed with the kinds tools that invaded our pristine development environments. One of those tools is gulp, and if you haven’t heard of it, don’t worry. Why should you hear of it?
A couple of weeks ago I introduced my talk on gulp by explaining how I made it simplify and speed up my development of control add-ins. If you are a real NAV developer, and if you didn’t classify this entire series on gulp into the “who cares” category, then chances are you’d stick with me today and learn how to set up gulp and start using it in VS Code.
In this post, I’ll explain what (and why) you need to do to get gulp up and running, and then I’ll create a very simple gulp task. This is the first post in a series where I hope to build an end-to-end example that you can even put to practical use in your projects.
Let’s get started.
Gulp is a Node.js module, which means you must have Node.js installed on your machine. Even though VS Code uses Node.js internally, it really only uses it internally, and you have to install Node.js separately to be able to run any of it. To check if you have node installed, start command prompt and run the following command:
node --version
(Alternatively, start your VS Code and click View > Terminal, or press Ctrl+` on your keyboard. All of examples in this and future posts on gulp will assume that you are typing all the commands in the Terminal window from VS Code, and that you have an AL workspace open in it.)
If the command line above doesn’t produce any result, or produces an error, then go to https://nodejs.org/en/ and install Node.js first.
Now that you have Node.js, your next step is to install gulp. As any Node.js modules, you can install gulp globally or locally. A local installation is per project, or workspace, or folder, or whatever you want to call your local directory. A module installed locally is only available to Node.js when you are inside that local folder. A module installed globally is available to Node.js on the entire machine, regardless in which folder, or project, or workspace you are.
How you want to install a module depends on how it will be used. Some modules provide only JavaScript runtime functionality, that can be invoked from JavaScript files executed by Node.js – these are typically installed locally. However, if a module exposes command-line functionality, then it must be installed globally.
It may not be entirely clear from the documentation that you may find online, but gulp must be installed both globally and locally. Global installation is needed only to provide the generic task-running command-line interface commands. Local installation is required so your local gulp runtime can be version-dependent on a per-project basis.
So, let’s install gulp globally, first:
npm i gulp --global
That was easy. Now it’s time to install gulp locally. You may be tempted to do this:
npm i gulp
But don’t! Yes, it would install gulp locally for your project, but it would be good enough only if you are the only person ever using that project, and only ever on that machine. Why is that?
Let’s look first at what npm is. Npm is a package manager. It installs and manages external packages required by your solution. If you ever did .NET development and have ever used NuGet, then npm is the same. To put it simply: npm is for Node.js for NuGet is for .NET. But apart from simply installing packages, npm can manage dependencies. If you depend on a package, if you declare a dependency on that package, npm can automatically handle these dependencies for you, download them when they are not available and keep them up to date.
If you used that simple line above, that simply installs gulp without any switches, it would install gulp into your project, but it wouldn’t make it a dependency of your project. It means that, depending on your git configuration, other developers may not get gulp (and its own dependencies) from your repo, and might run into trouble automating the same tasks on their own machine unless they install gulp locally for themselves, too.
So, armed with the new understanding of npm, you decide to see how to make gulp a dependency, but you quickly learn that there are two separate ways of doing it:
npm i gulp --save
npm i gulp --save-dev
The difference here is that the first one will make gulp a production dependency of whatever you are building, while the second one will make it a dependency of development environment. When building AL extensions, you are using gulp only for development, so the second option is the right one to choose. However, if – for example – you are developing VS Code extensions, and those extensions are going to use gulp while they are doing whatever they are designed to do, then you should use the first option to indicate that your extension requires gulp to run.
If you want to learn more about the differences, maybe this article can help you with that:
https://imcodebased.com/npm-save-or-save-dev-which-one-to-use/
Good. So now you know that for AL development you need only a development dependency, you need to run this:
npm i gulp --save-dev
When it’s done, you can test whether gulp works for you. If everything you did was correct (and why it shouldn’t be, it’s not that you’ve been building a spaceship), you should be able to run this:
gulp
It will produce the following output:
[<span style="color: black;">09:25:06</span>] <span style="color: red;">No gulpfile found</span>
This looks like an error, and it is. It’s gulp reporting for duty, and telling you it found no instructions. Now you need to tell gulp what to do and how. This error message tells you that no gulpfile was present, so let’s handle that part first. In the root of your workspace, simply create a new file and name it gulpfile.js. For now don’t put anything in there and simply leave it blank. With the file in there, run gulp again and observe the output:
[<span style="color: black;">09:29:31</span>] Using gulpfile <span style="color: #7030a0;">C:\Temp\Gulp\gulpfile.js</span>
[<span style="color: black;">09:29:31</span>] <span style="color: red;">Task never defined: default</span>
[<span style="color: black;">09:29:31</span>] To list available tasks, try running: gulp --tasks
This means that gulp can now read your task file and is able to run tasks. However, since your gulp file is empty, gulp found no tasks to run.
Let’s create the first simple task.
Gulp tasks are written in JavaScript, and each task is defined in a JavaScript function. This doesn’t mean that any function you declare in your gulpfile.js will automatically become a task, it simply means that to define tasks, you must define them inside functions.
For example, try putting this into your gulpfile.js:

(Mind you, this function is not yet a real gulp task, but it will serve as a good starting point.)
If you now try running gulp again, you will see that there is no change in results. For your function to become a task, you must explicitly make it a task, or to stay within the correct terminology: you must export it. I’ll blog about exporting tasks from gulpfile.js in my next post, because I want to keep this post as simple as possible. There is much more to exporting tasks than meets the eye, take my word on that.
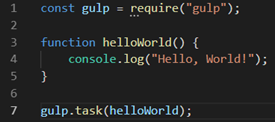
Gulp is a Node.js module, which means that to use it, you need to load it into your script first. In Node.js, we call this process requiring a module. To require a module, you simply invoke the built-in require function. Typically you require a module at the beginning of your script, so you could insert the following line at the top of your script:

Then, you can make your helloWorld function a task by simply passing it into the task method. You typically do it at the end of your gulp file. Your gulpfile.js would now look like this:
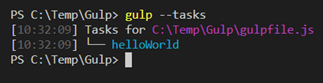
Running gulp still produces no effect, but if you run gulp –tasks you will see that gulp now recognizes your helloWorld function as a task it can invoke:
One cool thing with gulp is that VS Code natively understands them. Any task you configure in your gulpfile.js automatically becomes available to VS Code. To verify this brave claim, press Ctrl+Shift+P, then run the “Tasks: Run Task” command. It should show this:

There is one caveat here, though. Unlike the VS Code tasks.js file, that VS Code reloads every time it changes, the gulpfile.js file is processed only once per VS Code session. VS Code will process your gulpfile.js the first time you invoke “Tasks: Run Task” command, and no changes you make thereafter will be visible in the task list. If you change your gulp tasks in any way, by adding, removing, or renaming tasks, your VS Code task list will not reflect that until you restart VS Code.
Now that the task is obviously there, and that VS Code is aware of it, we can try and run it.
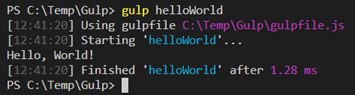
To run a gulp task, you can invoke it from the terminal by specifying its name right after the gulp command. Like this:
gulp helloWorld
This will run the task and show the following output:
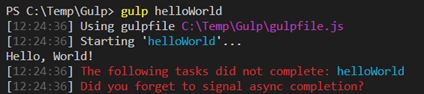
Obviously, something is wrong. That’s because the function you wrote is not a real gulp task, as I said earlier. Not every JavaScript function can be really used as a gulp task, there is a specific pattern that your functions must follow. I’ll blog a lot more about gulp tasks and how to write them, but for now let’s just say this: gulp tasks are executed asynchronously, and your tasks must signal completion in some way to indicate to gulp runtime that the task is completed, and the next task can be executed.
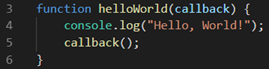
The simplest way to signal completion through the error-first callback. Every gulp function receives one argument, and that argument is of type function. That’s your callback argument that you must invoke when your task is completed. If your task is completed successfully, you simply invoke the callback without any arguments:
Try your helloWorld task now, and then pop a cork for your first successful gulp task:
And that’s it for now. At this point you have your gulp infrastructure in place, you have your first gulp task that you can invoke from both the terminal (command line) or command palette.
In my next post, I’ll explain a little more about exporting tasks from your gulpfile.js. Stay tuned, and feel invited to share your thoughts.
Pingback: Exporting tasks from gulpfile.js - Vjeko.com
Pingback: Exporting tasks from gulpfile.js - Vjeko.com - Dynamics 365 Business Central/NAV User Group - Dynamics User Group
Pingback: Exporting tasks from gulpfile.js - Microsoft Dynamics NAV Community
Pingback: Writing gulp tasks - Vjeko.com
Pingback: Writing gulp tasks - Microsoft Dynamics NAV Community
Pingback: Writing gulp tasks - Vjeko.com - Dynamics 365 Business Central/NAV User Group - Dynamics User Group
Pingback: Using gulp plugins to transform files - Vjeko.com
Your images are broken 😦
A quickfix to see the images is running this in the browser’s console (F12 – Console):
document.querySelectorAll(‘img’).forEach(x=>x.src = x.src.replace(‘newblog.’, ”))
The image urls are broken because they direct to “newblog.vjeko.com”, but “vjeko.com” still works.
Thanks 🙂
Indeed, while moving my blog to my new server, I used “newblog.vjeko.com” address for a short while. For some reason, in some of the posts, this remained fixed in the database. I’ve fixed that now, so all images should work, across the site 🙂
Thanks for the effort!
They work now 😉