One of the more effective, and probably completely unexpected, demos at Waldo’s and mine NAV TechDays 2018
session was the user profile picture demo. I say “completely unexpected” is that it shows something that you normally don’t expect from control add-ins. When hearing “control add-in”, most developers (but also most Microsoft people) have in mind a visual control that visualizes some data from NAV/BC and possibly allows you to interact with (C/)AL through that piece of UI. However, there are many other things possible, like having a completely non-visual “controls” that tap into the functionality of the web client and extend its functionality beyond what it was originally designed to do.
One of these is the user profile picture.
If you didn’t attend (or watch) the session, this is what the demo is about: it makes use of the user silhouette icon in the upper-right corner (that actually doesn’t represent anything, just sits there) and allows you to take your selfie and then uses that selfie as your profile picture that’s showing there instead. Pretty neat and cool..
How did I do it?
The first thing that I did is that I located the piece of HTML that shows the user icon. When clicking on it, it shows a small menu, and I have added some changes there. For NAV 2018, the image is repeated in the menu, so I simply added a click handler for that image. For BC I have injected a bit of new HTML that re-shows the user icon, so I could attach the click handler on it, too. From there on, it’s mostly the same for both 2018 and BC. The click handler shows some more UI that renders on top of the page: it shows a circle that contains whatever your camera sees at that point. When you click on the circle, it takes the photo, sends it back to NAV as a base64-encoded data URI string. NAV then stores it in a blob field.
Next time when NAV is loaded, NAV reads the content from the blob, sends it to the web client, and the control add-in receives it and shows it inside the user icon image, instead of that default empty silhouette.
There is another important difference between NAV 2018 and BC web clients. In NAV 2018, certain page elements are not physically present. For example, the user menu that pops up when the user icon is clicked, does not exist in NAV 2018, while it’s pre-rendered and then hidden in BC. That’s why for NAV 2018 the main script is a lot different: it sets up a mutation observer that listens to specific changes, and then injects some HTML and necessary event listeners when it detects the menu UI being rendered.
More or less, that’s it.
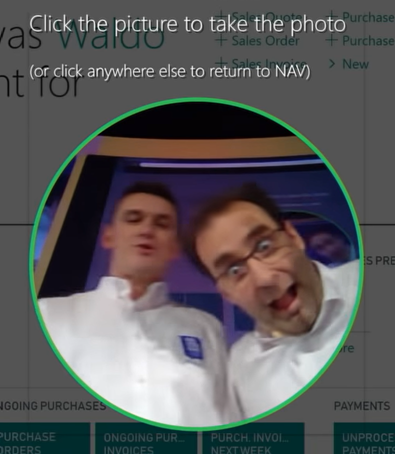
And this is what it looks when you have super-excited people around you while you are demoing this feature:
To make it all work, I had to apply some control add-in tricks, too.
First of those is how to create a control add-in that doesn’t display anything. Before extensions v2 it was simple: you declare a control add-in that has no height and width, and it simply doesn’t show. In extensions v2 you cannot show a 0 x 0 pixels control add-in, so you have to resort to a workaround: show a 1 x 1 pixels control add-in that doesn’t contain anything. Then show that control add-in as the last control in a page, and it will not consume any meaningful space nor will it interfere with anything there. It will still provide its functionality, though.
The second trick is where exactly to show that control add-in to have it usurp parts of the web client. The best solution is to show it as a part of an activity subpage of a role center. For my demo I extended only one, but you should in fact do this for all activities for all role centers to be sure it’s always available. Once you do that, your control add-in loads always when your web client loads, at least in the universal client where you always load directly into the role center. Once you put your control into the role center, since the web client in 2018 (and BC) is a single-page website (and it never reloads the entire page), your control add-in functionality (including functionality you injected into the standard web client) is always available.
Unfortunately, this trick doesn’t apply to situations where users bookmark their pages in their browsers, and then load into a list or a card page other than their role center. In that case, the control will not load until the user actually goes to the role center. In this particular case it means that the icon will not show the user’s photo, nor will clicking it run the photo taking functionality, until the user goes to the role center. This is a limitation to which there is no other solution than to inject the control add-in in all pages, which makes no sense.
One final disclaimer: this is simply a show-off, not something that I really recommend doing. It’s a dirty trick (and the code I provide with this demo is also fairly dirty and non-optimized because my focus was not on providing cleanest of code, but simply to demonstrate how something can be done easily). Yes, it works, and yes you can rely on it, just be careful when touching the standard NAV web client elements. Plus, keep in mind, any minor hotfix can break your control add-in.
That said, here’s the link to the repo: https://github.com/vjekob/controladdin-userimage
Again, there are two branches:
- Branch “master”: contains Business Central demo
- Branch “nav2018”: contains NAV 2018 demo
Good luck with this one.
Pingback: NAV TechDays 2018 Demos: User Profile Picture - Vjeko.com - Dynamics 365 Business Central/NAV User Group - Dynamics User Group
Pingback: NAV TechDays 2018 Demos: User Profile Picture - Microsoft Dynamics NAV Community
Pingback: NAV TechDays 2018 Demos: Keyboard Shortcut Listener - Vjeko.com
Pingback: NAV TechDays 2018 Demos: Keyboard Shortcut Listener - Microsoft Dynamics NAV Community
Pingback: NAV TechDays 2018 Demos: Keyboard Shortcut Listener - Vjeko.com - Dynamics 365 Business Central/NAV User Group - Dynamics User Group